如何优雅地使用 NPM 进阶篇
本文最后更新于:2026年9月21日 下午
前言
在如何优雅地替换掉宝塔面板一文中我介绍了通过Nginx Proxy Manager来替换宝塔面板的方案。该文章中我用的是host网络,由于NPM无法更改默认的 81 端口,所以会有安全隐患。本文会介绍如何创建一个docker network并兼容 IPv6 来更优雅的使用NPM。
搭建步骤
开启Docker的 IPv6(可选)
对于本机配置好 IPV6 的情况,如果想要Docker内也能使用 IPV6,需要手动的配置。
首先你要获知本机 IPv6 的子网,运行命令ifconfig找到网卡的如下段:
inet6 2605:xxxx:xxxx::1 prefixlen 64 scopeid 0x0<global>其次请将Docker尽可能更新到新版,然后编辑如下配置文件,如果没有这个文件就新建:
nano /etc/docker/daemon.json写入如下配置:
{
  "ipv6": true,
  "fixed-cidr-v6": "2605:xxxx:xxxx::1/64",
  "experimental": true,
  "ip6tables": true
}
这里的
fixed-cidr-v6并不一定需要你的公网 IP,只是用于bridge网络的,实际上可以用任意的子网,至少你和我下面提供的网段冲突即可。
注意修改 IPv6 子网。重启Docker服务:
systemctl restart docker这样就给 docker 默认的 bridge 网络启用了 ipv6,注意此时只有使用 bridge 这个网络的容器才有 ipv6,我们可以简单的验证一下:
docker network inspect bridge可以看到"EnableIPv6": true的字段。
创建一个公用的docker network
创建一个名为web_apps的网络,对于有 IPv6 的服务器,直接运行命令,不用修改:
docker network create --subnet="fc00:0000:0000:2::/64" --ipv6 web_apps如果本机没有 IPv6,则运行:
docker network create web_apps其他步骤都是相同的。
搭建NPM
其他的和上文就比较类似了。对于NPM的docker-compose.yaml文件如下:
version: "3"

services:
  npm-proxy:
    image: jc21/nginx-proxy-manager:latest
    container_name: npm-proxy
    restart: always
    ports:
      - 81:81
      - 80:80
      - 443:443
    volumes:
      - ./data:/data
      - ./letsencrypt:/etc/letsencrypt
    healthcheck:
      test: ["CMD", "/bin/check-health"]
      interval: 10s
      timeout: 3s
    networks:
      - web_apps

  php74:
    image: webdevops/php:7.4-alpine
    container_name: php74
    restart: always
    environment:
      - fpm.pool.listen=9074
    volumes:
      - ./data:/data
    networks:
      - web_apps

  php73:
    image: webdevops/php:7.3-alpine
    container_name: php73
    restart: always
    environment:
      - fpm.pool.listen=9073
    volumes:
      - ./data:/data
    networks:
      - web_apps

  data-static:
    image: mariadb:10
    container_name: data-static
    restart: always
    environment:
      - MARIADB_ROOT_PASSWORD=sample-password
    volumes:
      - ./database:/var/lib/mysql
    networks:
      - web_apps

networks:
  web_apps:
    external: true
请仔细看上面的配置文件,对于 PHP 等服务以及其他的Docker应用,其端口都没必要映射出来*,直接用NPM反代即可。
值得注意的是,对于需要使用web_apps的服务,yaml 配置文件末尾必须包括
networks:
  web_apps:
external: true并且每个service块中必须包括
networks:
- web_apps这样该service才会用web_apps这个网络。并且每个service名必须保持唯一,其他同网络内的容器想要访问该service只需要把service名作为host即可。
例如放置于./data/static_websites/ 目录下的enable-73.conf和enable-74.conf需要修改为
# ./data/static_websites/php/enable-73.conf

location ~ [^/]\.php(/|$)
{
    try_files $uri =404;
    fastcgi_pass  php73:9073;
    fastcgi_index index.php;
    include /data/static_websites/php/fastcgi.conf;
    include /data/static_websites/php/pathinfo.conf;
}
# ./data/static_websites/php/enable-74.conf
location ~ [^/]\.php(/|$)
{
try_files $uri =404;
fastcgi_pass php74:9074;
fastcgi_index index.php;
include /data/static_websites/php/fastcgi.conf;
include /data/static_websites/php/pathinfo.conf;
}NPM在线配置
首次访问NPM需要开放81端口来进行设置,建议在NPM中创建一个网站并开启 HTTPS 来反代 81 端口,然后再关闭 81 端口的映射,这样最为安全。
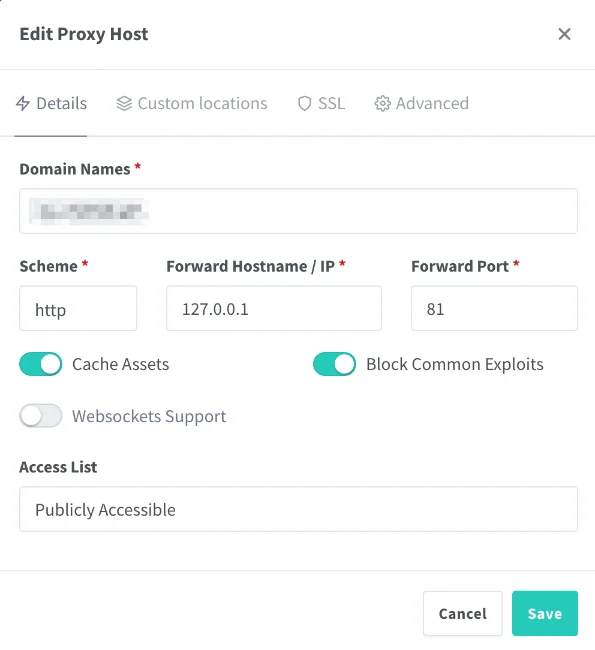
然后就可以通过域名来访问了,记得还要删除81端口的映射,即删除如下行:
- 81:81然后重建即可:
docker-compose down && docker-compose up -d一个🌰
例如我需要建一个 Cloudreve,同样是Docker容器,则docker-compose.yaml需要这样配置:
# ~/Cloudreve/docker-compose.yaml

version: "3"

services:
  cloudreve:
    image: cloudreve/cloudreve:latest
    container_name: cloudreve
    restart: always
    volumes:
      - ./downloads:/data
      - ./config/conf.ini:/cloudreve/conf.ini
      - ./config/cloudreve.db:/cloudreve/cloudreve.db
      - ./uploads:/cloudreve/uploads
      - ./avatar:/cloudreve/avatar
    networks:
      - web_apps

  cloudreve-redis:
    image: redis:alpine
    container_name: cloudreve-redis
    restart: always
    volumes:
      - ./redis:/data
    networks:
      - web_apps

networks:
  web_apps:
external: true如前文所提到的,Cloudreve的 HTTP 端口不需要映射出来,因为其和NPM处于同一个网络中。
Cloudreve 默认是监听5212端口,则NPM需要这样配置:
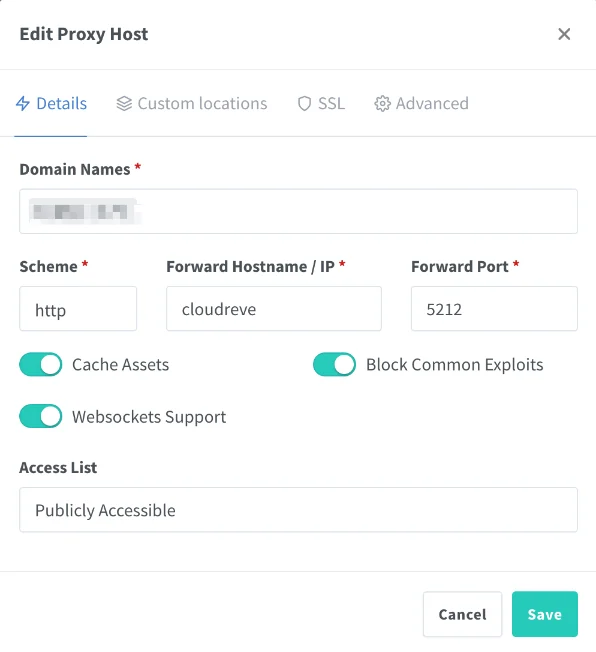
即Forward Hostname/IP需要填入你的service名(而不是container_name,container_name可以随意起)。
后记
请把本文与如何优雅地替换掉宝塔面板结合在一起参考,相信通过这两篇文章的介绍NPM的使用应该非常好上手了。